1. Add Track
After opening the app, tap “Start recording” at the bottom. The track is named after the place name of your current location. You can tap  in the upper right corner and choose “Tracks”, then long press the “Recording” track and choose Edit to change the track name.
Note: If the track location deviates from the actual location, you can tap in the upper right corner and choose “Settings”, then try turning “GPS Location Fix” on or off before recording again.
The track is displayed with a red, yellow, and green gradient according to speed:
- Green: slower speed, usually suitable as a reference for a walking track
- Yellow: about 18 km/h, suitable for indicating cycling speed
- Red: faster speed, suitable as a reference for a track made while using transportation
Through the color changes, you can not only see where you have been, but also intuitively understand your movement status on different road sections.
On the Settings page, you can choose the recording step length (10–200 meters). The system adds a record point at each interval of this length (changes take effect starting with new records). If the current GPS positioning error is greater than the step length, the map will display “Weak GPS Signal” in yellow. You can adjust the step length to increase the error tolerance range (this will not affect the step length of the current track recording). If there is no GPS signal, “No GPS Signal” will be displayed in red.
On the “Settings” page, the “Recording map type” option can be set to “Satellite” to display a satellite map.
After recording is complete, tap  at the bottom, then tap “End of record” at the bottom to end the track recording.
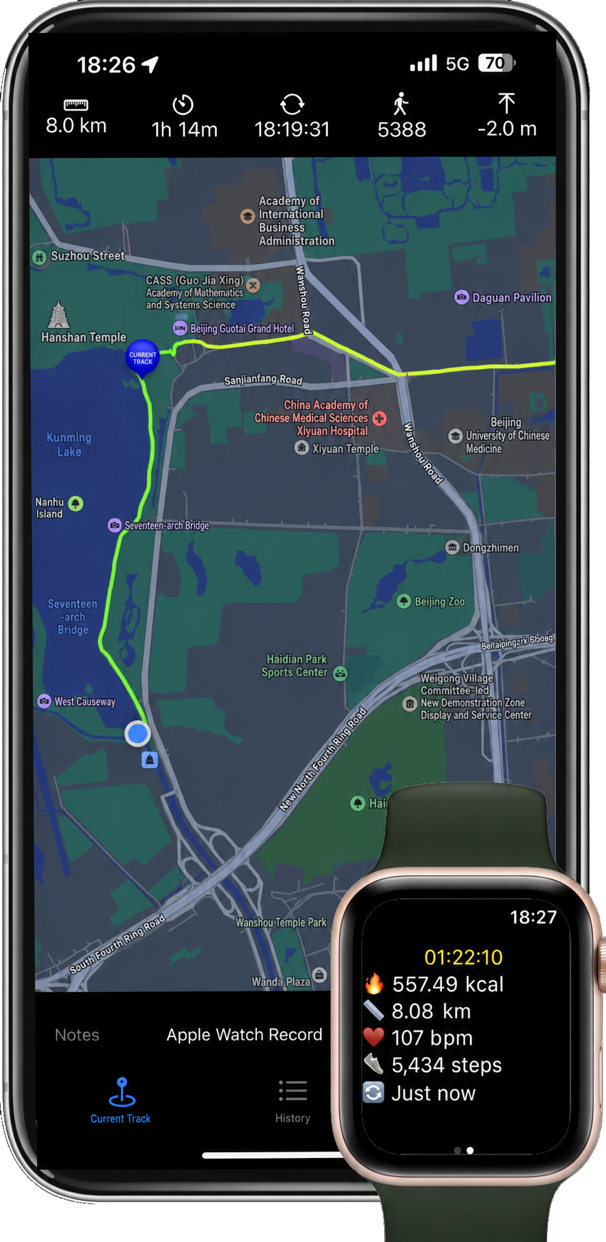
Information related to the current track is shown below the map. You can tap at the bottom to show or hide it. It includes the following information:
| Distance | Distance traveled |
| Steps | Number of steps walked in the track |
| Elevation | Elevation gain in the track |
| Update | The last time the track was updated If you find that the update time has stopped, please go to the Settings page, tap “Location Permission Settings”, select location, and choose “Always”. |
| Duration | Track duration |
2. Add Locations and Calculate Distance
Tap in the upper right corner and choose “Places”, then tap  “Add Location” at the bottom to display the location search screen. Enter a place name in the search box, and the corresponding place names and distances will appear below. Tap a place name to add that place to the location list. If you cannot find the place, try changing the country or region on the left and search again.
Tap “Update Location” at the bottom (if a location permission prompt appears, choose Allow). The name of your current location will be shown at the top, and the distance between your current location and the added places will be shown on the right side of the location list. Tap in the upper right corner to enter the “Map” page, and the map will focus on your current location. You can also tap  at the bottom of the “Map” page to update the location.
Tap a place or the current location name to show the following options:
- Add as place: Add the current location to the location list.
- Set as origin: Change the origin used for distance calculation. After entering the “Map” page, the map will focus on the origin location.
- Edit: Edit the place name or add notes in the details.
- Delete: Delete the place.
- Weather: Show the weather for this place for the next 24 hours and the next 7 days.
- Street View: Show the street view for this place (available only in some regions).
- Nearby facilities: Search for nearby facilities (such as restaurants, convenience stores, etc.). You can choose from two data sources: Google and Apple Maps. You can set the search radius in “Settings” (tap in the upper right corner and choose “Settings”).
Tap “Edit” in the upper left corner, select several places, and enter a group name to group these places in the location list. You can choose the group to display in the upper right corner.
3. Map
Tap in the upper right corner and choose “Map”. When not recording a track, tap the ![]() icon button at the bottom to quickly focus on your current location.
icon button at the bottom to quickly focus on your current location.
Places added on the Places page are displayed on the map as blue labels with white text.
The upper right corner of the map also shows your current heading direction with a blue arrow, helping you judge your direction of travel more intuitively and reducing wrong turns or detours.
On the Places page, tap the distance number next to a place to display the route from the current origin to the target place on the Map page.
You can choose according to your actual needs:
- Walking route
- Driving route
- Bicycle route
- Public Transportation route
Public transportation routes are shown as colored solid lines, making it easy to distinguish different transit sections. Walking, driving, cycling, and other routes are shown as dashed lines to keep the map information clearer.
If you want to view more detailed route information, simply tap the ![]() icon at the bottom to show or hide route details, including route duration, distance, bus stops, route information, and more.
icon at the bottom to show or hide route details, including route duration, distance, bus stops, route information, and more.
Tap in the upper right corner to see the following options:
| Auto-focus current location | After you start recording a track, every time a new record point is added, the map will automatically focus on that point. If you want to browse tracks in other locations, you can select this option so browsing will not be interrupted. |
| Reference | Select a previously recorded track and display it on the map as a reference. The reference track is shown as a dashed line, so it will not interfere with the current route while helping you compare it with a path you have taken before. You can choose a year in the upper right corner of the screen to select tracks from other years. At the bottom, you can choose whether to “Show labels for reference tracks”. |
| End | End recording. If the track was recorded with Apple Watch, it is recommended to end it in the Apple Watch app. |
| Marker | After you start recording a track, add a marker at the current location and attach a photo taken there (see Section 5). |
4. Use Apple Watch to Record Tracks
Open the “Journey GPS Tracker” app on Apple Watch. If prompts appear for permission to read and write health information, choose Allow All. Then tap “Cycling”, “Hiking”, “Running”, or “Walking” as appropriate. Open the “Journey GPS Tracker” app on your phone and confirm that the current track page shows a track named after your current place. If a location permission prompt appears, choose “While Using the App”. You can then view the track recorded by Apple Watch on your phone. During this time, Apple Watch can continue recording data even after the phone app is closed, and it will automatically sync with the phone app the next time it is opened.
You can change the track name using the same method as in Section 2.
The information displayed on the watch app is:
| 🔥 | Calories burned during the track |
| 📏 | Distance traveled in the track |
| ♥️ | Current heart rate (beats per minute) |
| 👟 | Number of steps walked in the track |
| 🔄 | The time difference between the latest GPS coordinates sent to the phone and the current time (“Just now” is displayed if it is less than 60 seconds). |
| 🔋 | Battery level. 🪫 is displayed when it is below 20%. |
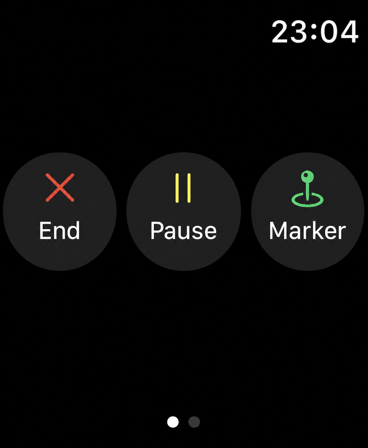
Swipe left on Apple Watch to show the control screen, where you can pause/continue, end, or mark the track. After ending the track recording, you can view the workout record in the built-in Fitness app on your phone.
5. Add Marker
After recording starts, tap  at the bottom, or tap in the upper right corner and choose “Marker” from the pop-up menu:
- The camera screen will appear. After you take a photo or close it, the Edit Marker screen will be shown. You can modify the name (by default, it is named after the place where the marker was added), attach an image from Photo Library, or take a new photo. After editing is complete, tap “Add” at the top to add a marker containing the image.
- Tap “Save” at the bottom to save the photo you took to the album.
- After selecting “Take Photo”, swipe on the image with your finger to display a square with a green border. Tap the “Cut” button at the bottom to cut the image inside the square.
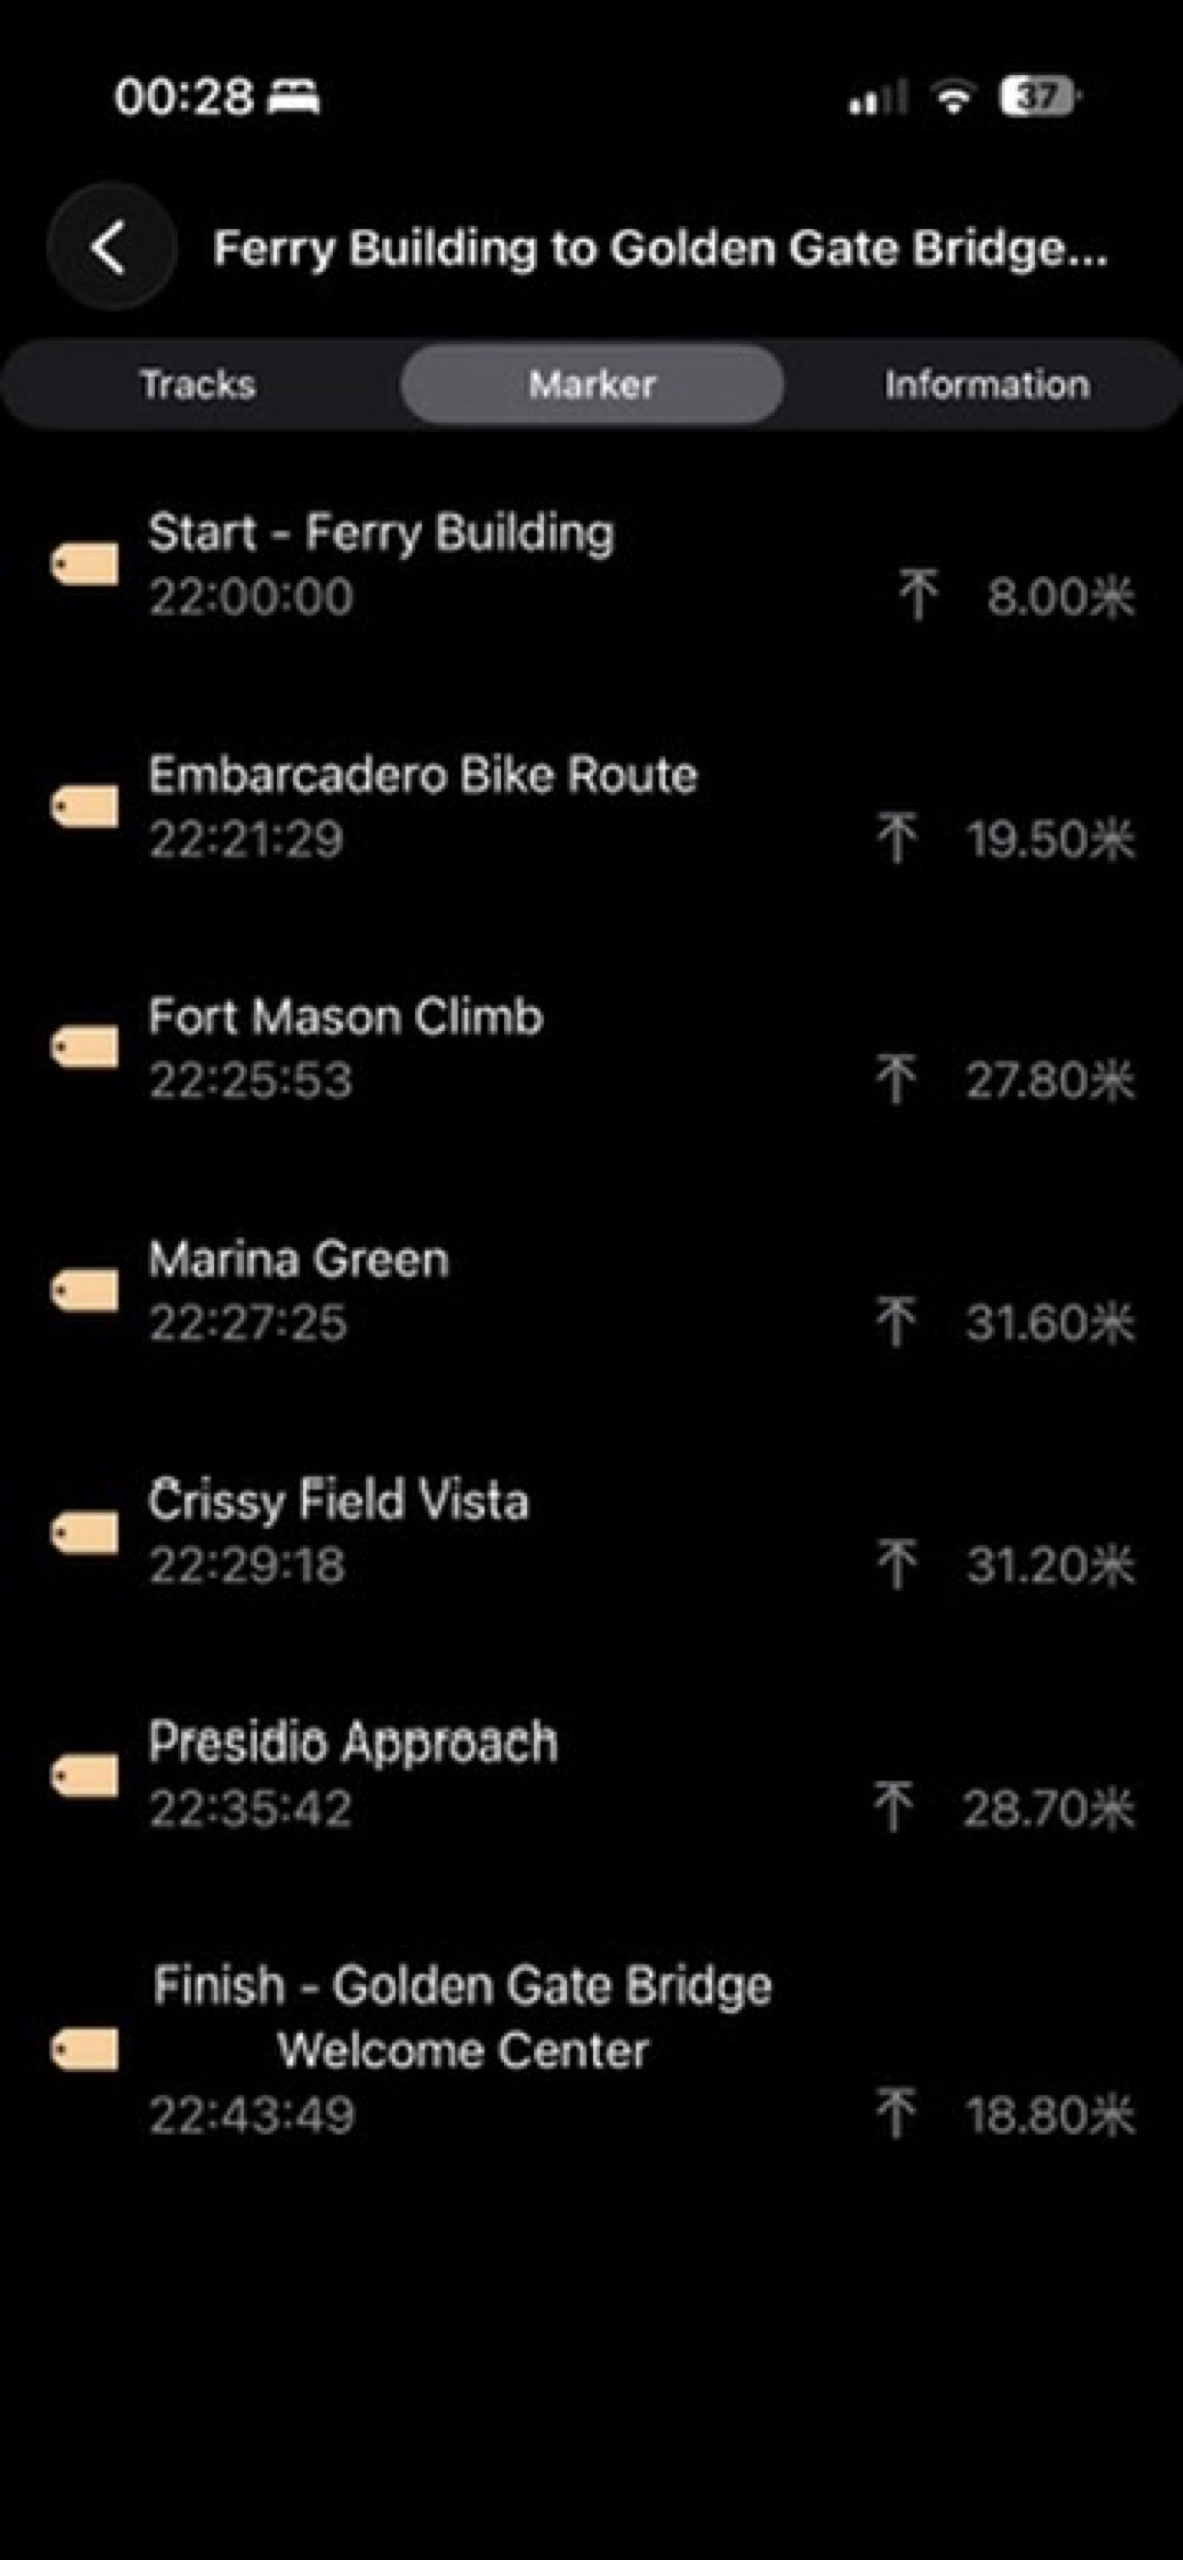
Tap a marker added on the map to display the marker information and thumbnail.
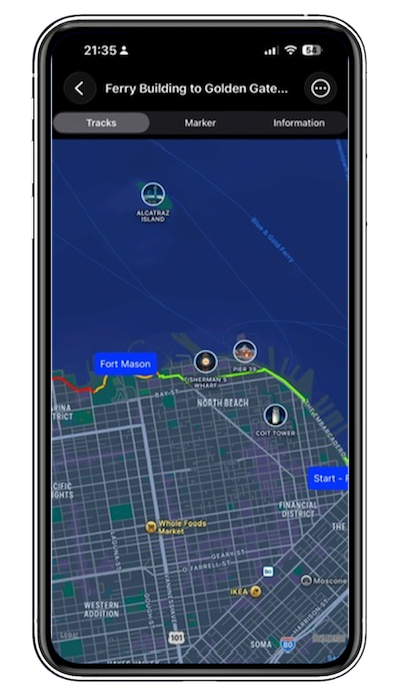
Tap in the upper right corner and choose “Tracks”, then tap the relevant track and choose the Marker page at the top to browse the marker list for the current record (as shown on the right):
- Long press a marker name to edit or delete the marker.
- Tap a marker to show detailed information. Tap an image to display it full screen, and use gestures to zoom in or out.
6. Browse Ended Tracks
Tap in the upper right corner and choose “Tracks” to view the list of all records, including record names and start times. Long press a track name to choose “Edit” to change the name or choose “Delete” to delete the record.
Long press a track name and drag it onto another track name. You will be prompted whether to merge the tracks. Choose “Confirm” to move the dragged track’s data to the target track and delete the dragged track.
Tap the corresponding record name to view the recorded track. Tap  in the upper right corner to show the following options:
| Export to GPX | You can export the track as a GPX file. On the History page of the “Journey GPS Tracker” app on another device, tap in the upper right corner and choose “Load from GPX” to import it again. Note that exported tracks do not include step-count information or marker images. |
| Export as KML | You can export the track as a KML file. |
| Edit Track Range | Select the range of the track to display. Tap “Cut” to delete the parts of the track that are not displayed. |
On the “Settings” page, the “History map type” option can be set to “Satellite” to display a satellite map.
7. Settings
Tap in the upper right corner and choose “Settings” to see the following buttons and features:
| Automatic sync | The app’s tracks, places, and marker data are automatically synced to other devices through iCloud (this feature cannot be turned off). |
| Step Length | See Section 1 |
| Nearby facility search radius | See Section 3 |
| GPS Location Fix | Fixes GPS location drift in mainland China. If you find that the GPS track deviates in other regions, you can try disabling this option and recording again. |
| Location Permission Settings | Set location permissions. To use this app properly, please set location permission to “Always”. |
| Show places on map | When selected, added places are shown on the map using blue squares. |
| Show heading direction on map | When selected, the current heading direction is shown with a blue arrow in the upper right corner of the map. |
| Map Type | Choose whether to use a flat or satellite map in the map and historical tracks. |
8. FAQ
- Apple Watch cannot locate tracks after reinstalling the app
- You can try the following method to reset location permissions and other security settings: go to system Settings > General > Transfer or Reset iPhone > Reset > Reset Location & Privacy.
- The recorded track deviates from the actual route
- You can go to the Settings page, turn “GPS Location Fix” on or off, and then record again.
- How can I continue recording on a track that has already been saved?
- Version 1.20 no longer supports continuing to record an ended track. You can record a new track, and after ending it, drag and drop the second track onto the first track in the historical tracks screen to merge them. If you want to display the previous track while recording, tap the menu in the upper right corner, choose “Reference”, and select the previous track as the reference.
- Can it be used on Mac?
- You can click the download link at the top of the page or search for the app name in the Mac App Store, then select “iPhone & iPad Apps” on the right to find and download the app.
Comments
Comments are reviewed before they appear below the article.
No comments yet. Be the first to comment.