Category and Subcategory
Category list
This application groups records into subcategories, and group subcategories into categories. You can view all the categories in Category tab(Tap the upper right corner![]() and select “Category Management”), Click “Import” to select and add build in categories and subcategories.
and select “Category Management”), Click “Import” to select and add build in categories and subcategories.
Add category
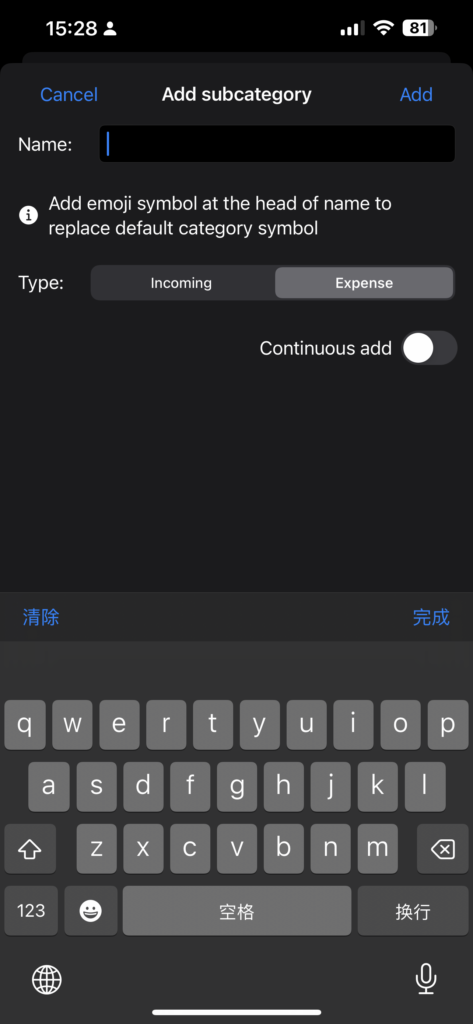
In “Category Management” page, You can add new category or subcategory by clicking ‘+Category’ or ‘+Subcategory’ in the bottom.
- After adding a category, you also need to add subcategories within it. Categories are only used to group subcategories, and subcategories are used to group income and expense records.”
- When adding a subcategory, you need to select either “Income” or “Expense” type. When adding an expense record, you can only select an expense subcategory (income subcategories and categories that do not contain income subcategories are hidden), and the same applies when adding an income record.
- To edit/delete a category/subcategory, long press the name of the category, select ‘Edit’ or ‘Delete’ in the popup menu.
Expense/incoming tracking
Add Record
Tap the upper right corner![]() and select “Record”, then click “+Expense” or “+Incoming” button, fill information of the new record, click “Add” in the upper right corner.
and select “Record”, then click “+Expense” or “+Incoming” button, fill information of the new record, click “Add” in the upper right corner.
| Amount | You can input +,-,* to do simple calulation in amount input field. Click |
| Category | Select an expense/incoming subcategory for the record. only valid(expense or incoming) category and subcategory are shown. |
| Merchant | You can select from merchants previously recorded in same subcategory by clicking |
| Label | Mark record with a label. For example, label the expenses of a specific trip or label the expenses of an specific activity, etc. Labels can be edit or deleted in “Label Management” page(Tap the upper right corner Click Click the added tag to delete it from the current record. The summary of different labels can be viewed at “Chart” page. |
| Payment | Select a payment method defined in “Payment Management” page. The record will use the payment’s currency. The summary of different payments can be viewed at “Chart” page. |
| Date | Click the date and fill information in popup window. |
| Detail | Click “Detail” tab and fill the information. You can enter a keyword in the textfield and click You can also past your bill or order text into the text field and click |
Note that, only amount and category are required fields, other fields are optional.
Add record with image
Click “Image” tab, you can attach a image with the record(For example, add an image of receipt or invoice). You can also add an image by dragging it from other app to the Image tab or “+ Expense/Incoming” button.
You can use your finger to drag a green rectangle to select a region of the image
Following action can be done by clicking the buttons in the bottom of the tab.
- Photos: add image from Photos app
- Camera: add image by taking a picture using camera
- Edit > Crop: crop the selected region out of image
- Analyse: list of money amount, date, merchants will be prompt in a new window if there is any contained in selected image region(or the whole image if no selection). Three categories will also be prompt for selection.
- Edit > Clear: Remove the image
Notice:
- The merchants information can only be recognized when there is at least one previous record contains same information.
- It is better to select relevant region before click “Analyze” to improve accuracy
- When adding second image, the system will prompt “Do you want to merge with existing images?” Selecting “Yes” will stitch the new image below the old image.
View records
- Tap the upper right corner
 and select “Records”, this will view all the records by date.
 - Tap and select “Category Management” page, click one subcategory, this will view all the records in this subcategory by date.
- Tap and select “Label management” or “Payment management” page, then select one label or payment, this will view all the records has certain label or using certain payment.
- Tap and select “Chart” page, click Total Expense” or “Total Incoming”. then click any link until reaching the last page, this will show records matching selected condition.
- For 1 and 2, the total expense and income of the whole year and month will be shown in the top. Click the date text on the top will pop up window to switch displaying date.
- show records of the whole year or month.
- show today’s records
- show records of specific date
- You can click the record to view more information.
- You can edit/delete record by long pressing(mouse right click in MacOS) the record.
- You can click “Edit” in the upper-left corner, then select some record:
- Click “Move” to move records to other subcategory,
- Click “Label” to label them
- Click “Delete” to delete them.
- Click “Done” in the same place to exit edit state.
- Clicking the down-ward triangle in the top of records to change records order(in time descending or amount descending order).
- Click
 in the bottom. Here, you can search records which detail, merchant contains certain keyword. Only relevant records will be shown(selected category’s records for 2, records using selected payment for 3, etc). The Edit and Sort button in 8, 9, 10 also exists.
Chart
Chart settings
Tap the upper right corner![]() and select “Chart” page. You can view statistic on the records by different angle. For example, show total sum of the records for each year, then in each year, show total sum of the records for each month.
and select “Chart” page. You can view statistic on the records by different angle. For example, show total sum of the records for each year, then in each year, show total sum of the records for each month.
You can change the summary fields by click Edit in “summary method and order” section. Dragging![]() in the right of the summary method to change the order.
in the right of the summary method to change the order.
Summarize records by chart
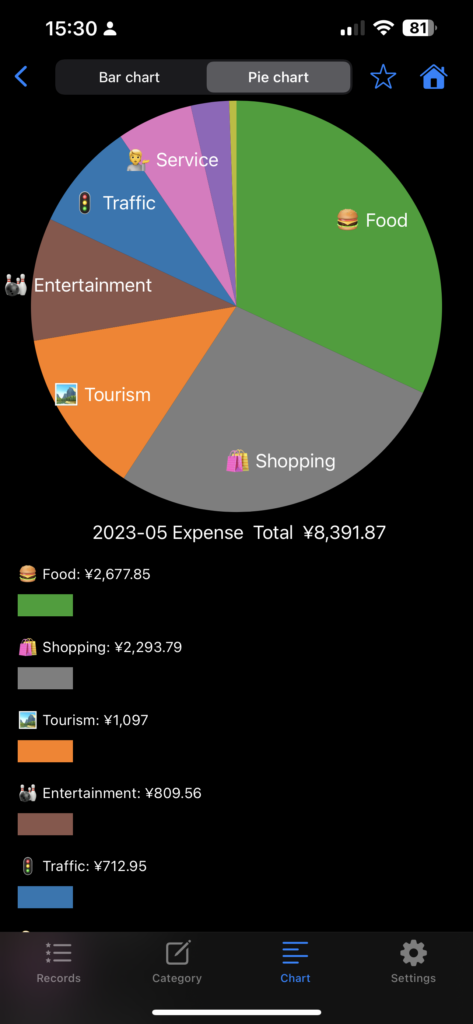
When returned to home page of the “Chart” page, click ‘Total expense’ or ‘Total incoming’ to enter summarize page.
Click ![]() to add this page to quick access pages. Added quick access links will be listed under home Chart page. When clicking the quick access link, related page will be accessed, click
to add this page to quick access pages. Added quick access links will be listed under home Chart page. When clicking the quick access link, related page will be accessed, click![]() will remove the quick access link.
will remove the quick access link.
If the access path of current summarize page contains year\month\day or year\month or year only and these fields’s value are same with current date. This app will prompt “Do you want to keep the date on access path always uptodate?” when adding this page to quick access. If selecting ‘Yes’, the date of the quick access link will always be current date. For example, if current date is 2021/7/1, and you add summarize page of Food category in 2021/7 to quick access, when entering August of 2021, the link will point to 2021/8’s summarize page.
Template Management
Tap the upper right corner![]() and select “Template Management”.
and select “Template Management”.
You can config the app to add record automatically in a specific day of each month (For example, add X dollar expense at day 31 of each month for iCloud monthly service fee). If a date is not valid in certain month, the auto-created record will be set for the last day of the month. (February does not have day 31, so the new record date will be set to 29 February or 28 February) .
Label Management
Tap the upper right corner![]() and select “Label Management”.
and select “Label Management”.
Here you can add labels with name and color. You can then mark each record with one of labels you defined. The summary of different labels can be viewed at “Chart” tab.
Payment Management
Tap the upper right corner![]() and select “Payment Management”.
and select “Payment Management”.
You need to define a payment if you want to add record with non-default currency. The summary of different payments can be viewed at “Chart” page.
Feedback
Tap the upper right corner![]() and select “Feedback”.
and select “Feedback”.
If you have any question or suggestion about the app, you can click “Questions”. If notification privilege for this app is not enabled, app will display a dialog when enter the feedback page. Click ‘Yes’ to enable to the privilege to receive reply notification.
Settings
Enter the “Settings” tab, here you can use following functions and settings.
| Auto-Sync iCloud | Categories, subcategories and records will be automatically synchronized with iCloud across different devices in same iCloud account. |
| Owner authenticate | Authenticate using FaceID, TouchID or Password after entering the app to protected your privacy. |
| Export to file | Export categories, subcategories and records data to CSV file. Note that image data in records will be ignored. |
| Import from file | Import categories, subcategories and records data from CSV file. Note that only data in CSV file that does not exists in local device will be imported. |
Import/Export cvs file format
Each line in imported/exported cvs file contains data of one category, subcategory, label or record, seperated by comma. If there is a comma or change line in the field, use \, (full-width comma) and \n.Category contains following fields:
- 0
- Category id, any string that can uniquely identify the category.
- Category name
Subcategory contains following fields:
- 1
- Subcategory id, any string that can uniquely identify the subcategory.
- Subcategory name
- Parent category id
- true — incoming subcategory, false — Expense subcategory
Record contains following fields:
- 2
- Record id, any string that can uniquely identify the record.
- Parent subcategory id
- Eecord date(year-month-day hour:minute), ex. 2022-01-12 05:15
- Amount, ex. 100.00
- 0
- Merchant
- Detail
- Label id
Label contains following fields:
- 3
- Label id,any string that can uniquely identify the label.
- Label name
- Label color:RGB color value ranged from 0 to 1, seperated by |, ex. “0.5|0|0.5”
Payment contains following fields:
- 4
- Payment id,any string that can uniquely identify the payment.
- Payment name
- Payment currency:ex. “USD”